Do you grasp the concept of free body? If you’ve got a handle on it, you’ve pretty much nailed 80% of the mechanics of material. That’s how crucial understanding the concept of free body is.
Many students, perhaps without realizing it, struggle because they haven’t fully grasped the concept of free-body.
In this article, I aim to thoroughly and clearly explain the concept of free-body and how to draw free body diagrams. This is a fundamental step that every student of material mechanics needs to tackle, so I strongly encourage you to read it.
If you’re interested in learning how to draw a free-body diagram for specific problems, please refer to the article below (some of which are still being written).
![[thumbnail]_Vol1-2-1en](https://secondinspire.com/wp-content/uploads/thumbnail_Vol1-2-1en-min-160x160.png) The concept of the free body (vol.1-2-1)
The concept of the free body (vol.1-2-1)
![[thumbnail]_Vol1-2-2en](https://secondinspire.com/wp-content/uploads/thumbnail_Vol1-2-2en-min-160x160.png) The concept of the free body_Types of support (vol.1-2-2)
The concept of the free body_Types of support (vol.1-2-2)
![[thumbnail]_Vol1-2-3en](https://secondinspire.com/wp-content/uploads/thumbnail_Vol1-2-3en-min-160x160.png) The concept of the free body_Truss (vol.1-2-3)
The concept of the free body_Truss (vol.1-2-3)
- “Internal forces” are invisible, while “external forces” are visible.
- Understanding internal forces for grasping stress and deformation in materials is significant.
- You can observe internal forces acting on a cut surface only when you treat the material as a free body by virtually slicing it at a specific location.
- It’s essential to follow the procedure and accurately draw the free body.
- Gaining a comprehensive understanding of how internal forces are transmitted within materials is crucial.
溢れでる涙を抑えられない!!
全11巻完結
私・ぽるこが全力でオススメする極上の漫画たちを紹介した記事です。思わず読みたくなる漫画が見つかるかも!
First, before discussing what a free-body diagram is, let’s consider “Internal forces” and “External forces.”
External forces are loads applied from outside the material. In mechanics of materials questions, you can find them represented on diagrams in test sheets as forces or moments (note that “load” here includes not only forces but also moments). In this sense, external forces are visible.
On the other hand, “Internal forces” are loads transmitted within the material and are not initially visible. Additionally, we could describe loads acting mutually between adjacent (connected) objects as internal forces.
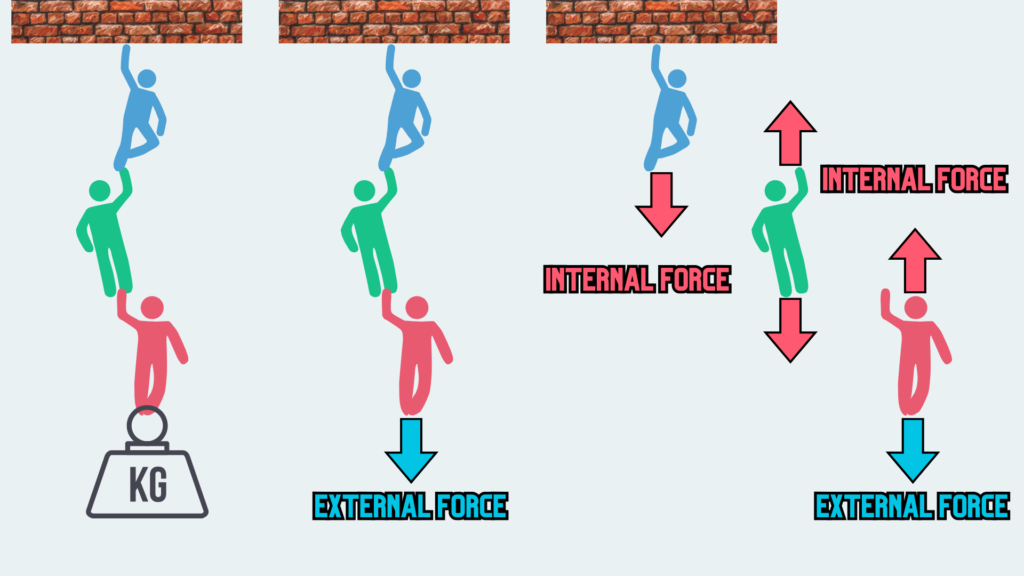
Let’s consider a scenario like this: imagine a structure with three people in a row, and a weight is connected to the bottom person. The weight pulls on the leg of the person at the bottom, which represents the “External force” acting on this three-people structure.
Naturally, the person in red is affected by the weight pulling on him. Similarly, the green and blue individuals are also affected and pulled in the same manner. The red person exerts a force on the green person, and the green person exerts a force on the blue person. This chain of forces being transmitted to the next individual represents “Internal forces” within the structure.
If we examine closely, we’ll notice that these individuals’ legs, torsos, and arms are all experiencing the same load. Consequently, “Internal forces” are transmitted throughout the material due to “External forces,” and these “Internal forces” are not concentrated at any specific point but exist throughout the material. The same principle applies within the material as it does with the people hanging from the weight.
To address questions such as what type of load (stress) the material is experiencing, how much deformation is occurring, and whether the material will fail, it is essential to accurately understand how these “Internal forces” are transmitted.
So, how do we understand the magnitude and nature of these crucial “Internal forces” transmitted within a material?
We need to virtually cut the material.
Only by slicing the material at a specific section can we visualize the internal forces acting on the cut surface. This section of material, removed after cutting, is referred to as a “free body.” It cannot be emphasized enough that drawing internal forces accurately on a diagram is only possible after cutting the material as a free body.
Many students mistakenly believe they’ve drawn a free-body diagram without actually performing the necessary cut or fully grasping this concept. While they might occasionally get it right by chance, when faced with more challenging questions, confusion is almost guaranteed.
Without the ability to draw free-body diagrams accurately, understanding internal forces becomes elusive, making it difficult to comprehend stresses and deformations in materials. Mastery of mechanics of materials hinges on understanding the concept of a free body.
Drawing the correct free-body diagram using the proper procedure is incredibly important, even if it may seem a bit tedious. Please refrain from attempting to draw an incorrect picture on your own way.
Let’s take a look at the correct procedure:
The key is to cut the material at the specific section where you want to understand the internal force acting there. This is crucial because, as we’ll explain later, we can only analyze the internal force on the cut surface. You’re free to make the cut in any manner you choose, so it doesn’t matter where or how many sections you cut at the same time.
Now that you have learned the procedure, let’s begin with the simplest example to see exactly how it’s done. If you’d like to explore more examples, please read the following articles (which are currently being written).
Let’s examine how internal forces are transmitted inside a round bar subjected to a simple tensile load. Let’s follow the procedures mentioned above.
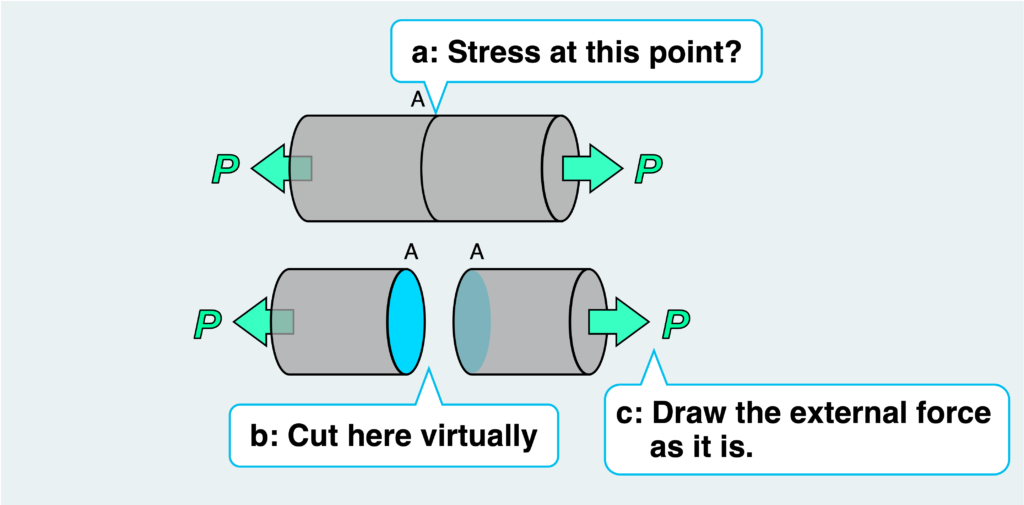
If we want to determine the magnitude and type of stress acting on a specific section of the round bar (for example, section A, see “a” in the figure above), we first cut the round bar at section A and treat it as a free body (see “b” in the figure above). The external force originally acting on the material must then be depicted as it is (see “c” in the figure above). However, in this state, the free body is not in equilibrium due to the external force.
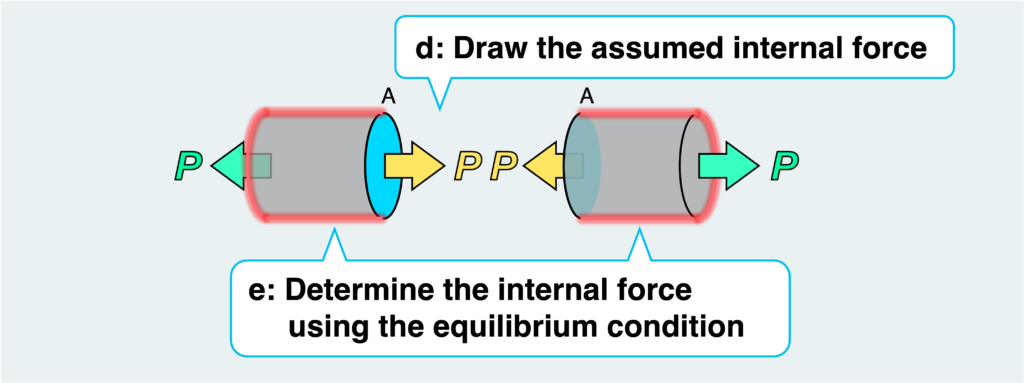
Therefore, to balance the external force, another force must act somewhere. Since no force other than the external force can act on the free surface (the red line in the figure), an internal force must act on the cut cross-section (the blue surface). This internal force applied on the virtually cut surface could be in the form of a vertical load, shear load, or bending moment.
Although not explicitly shown in the figure (due to visibility constraints), shear loads and bending moments that may occur can also be depicted on the cut surface (see “d” in the figure above). However, upon considering the equilibrium of this free body, it becomes evident that only one vertical load acts on the cut surface as an internal force, depicted in yellow in the figure, and its magnitude is found to be equal to the external force P (see “e” in the figure above).
Even if shear load and bending moment were initially assumed as internal forces (see “d” in the figure above), it becomes apparent that they do not exist according to the equilibrium condition.
By accurately drawing the free body diagram and considering its equilibrium conditions, it is possible to determine the internal forces acting on a specific section of the material (in this case, section A).
In the example above, we determined the internal force acting on a specific cross-section (section A). However, the purpose of considering a free body extends beyond this.
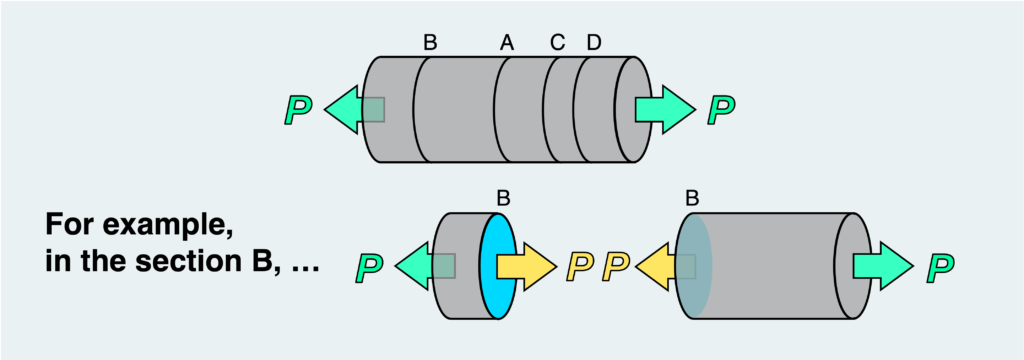
Let’s take it a step further and examine how the internal force is transmitted to cross-sections other than A.
For instance, we can consider free body cut at other cross-sections such as B, C, and D as shown in the figure above. It’s evident that the free-body diagrams drawn for any of these cross-sections are essentially the same. In other words, while the length of the free body may vary, the internal force acting on it remains consistent with that on section A; i.e., the magnitude of the vertical load P is the same as that of the external force.
This implies that within a round bar subjected to a simple tensile load, an internal tensile force of the same magnitude as the external force acts, regardless of which section is virtually cut.
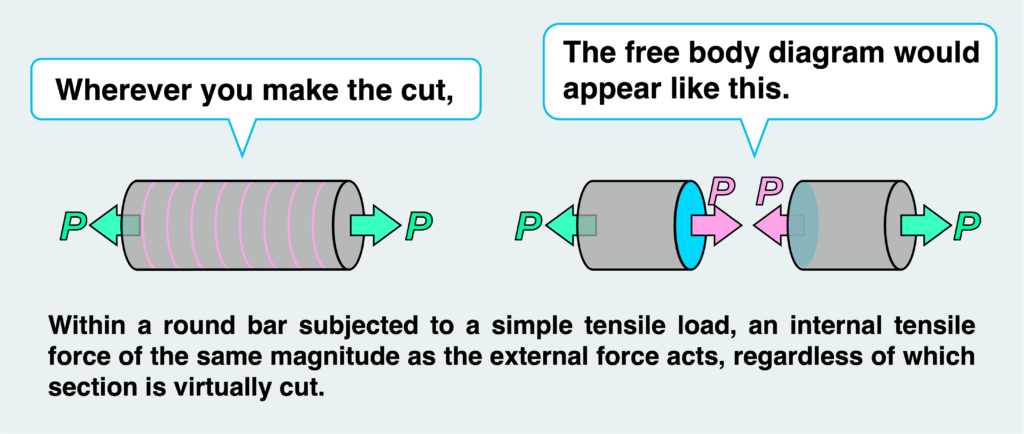
While it’s crucial to determine the internal force in a specific part when considering a free body, it’s even more vital to comprehend how the force is transmitted throughout the interior of the member and the overall picture of internal force transmission. This understanding may not be as critical in tension/compression problems, but it becomes especially important in cases involving bending and combinations of these forces.
Stress, deformation, and other questions in the mechanics of materials are fundamentally based on internal forces. To understand internal forces, mastering the concept of free body is essential.
Once the concept of free body is thoroughly understood, the mechanics of materials becomes much more manageable. Let’s strive to master the mechanics of materials by grasping the concept of free body.
In the next article, I will delve deeper into the concept of free body through various pattern of problems.
- “Internal forces” are invisible, while “external forces” are visible.
- Understanding internal forces for grasping stress and deformation in materials is significant.
- You can observe internal forces acting on a cut surface only when you treat the material as a free body by virtually slicing it at a specific location.
- It’s essential to follow the procedure and accurately draw the free body.
- Gaining a comprehensive understanding of how internal forces are transmitted within materials is crucial.
溢れでる涙を抑えられない!!
全11巻完結
私・ぽるこが全力でオススメする極上の漫画たちを紹介した記事です。思わず読みたくなる漫画が見つかるかも!

![[thumbnail]_Vol1-1en](https://secondinspire.com/wp-content/uploads/thumbnail_Vol1-1en-min-940x529.png)


